By compressing the pictures. Depending on the tools available you may apply this compression (1) to your existing PDF, (2) while generating your PDF, (3) to your source document, or (4) to your individual pictures.
How large might my PDF be?
A good assumption is that your PDF will be at least as large as the sum of the pictures that go into it. This isn’t always true – some PDF generators insist on applying some compression (making the file smaller than estimated), while some edits may turn JPEG-compressed pictures into PNG or TIFF (dramatically increasing the file size). Still, it’s a start.
If you’re illustrating your writing with pictures from a modern digital camera, it’s easy to create a huge document. The post Walking to Tulampanga Alum Cliffs contains just 15 photos. As originally taken, these are each 4,000×3,000 pixels, and average 3.7 megabytes each. Put together, they occupy 55 megabytes – far too large to e-mail.
Can I “compress” pictures by resizing them in my word processor?
No. Most word processors store all pictures in their original format and file size. This is independent of their dimensions on the screen and on the page. Resizing alone may affect the size of the resulting PDF, but only if as a side effect of the compression settings in option 2 below.
So what does work?
1. Compress an existing PDF
If you’re using Mac OS, you have Preview.app. You may have never launched this application intentionally, but it’s the default viewer for most image formats. Double-click on an existing PDF and it will probably open in Preview. If it doesn’t, locate Preview in the Launchpad or Applications folder, launch it manually and open your PDF.

If you’re having trouble finding Preview.app, look for this icon. Don’t confuse it with iPhoto, which may have a similar icon.
Once your PDF is open, go to the “File” menu and select “Export…”. Do not select “Export as PDF…”, which is the menu item below “Export…”. Set “Format” to “PDF”. This will give you a second option called “Quartz Filter”. Set “Quartz Filter” to “Reduce File Size”.
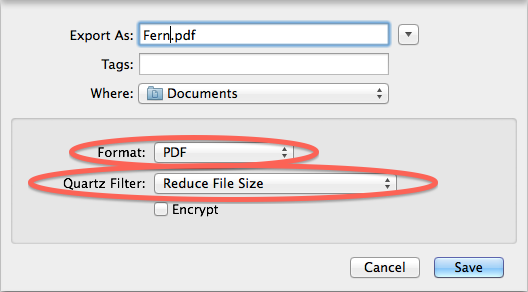
Preview.app configured to compress a PDF.
If you have use for the uncompressed file, make sure you don’t overwrite it with the compressed version.
2. Change compression settings while exporting
Applications that export to PDF usually offer a quality settings, but the exact implementations vary widely.
In Microsoft Office for Windows from 2010 onwards (or 2007 with the Save as PDF or XPS Add-in installed), make sure that “Optimize for” is set to “Minimum size (publishing online). (However, a more common problem with this exporter is that its “Standard” quality setting still applies some compression, and is not truly suitable for print.)
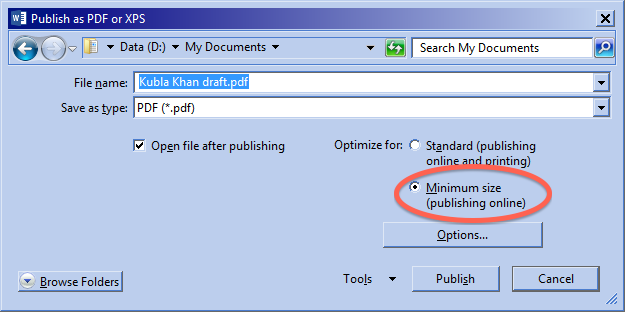
Microsoft Office 2013 exporting to PDF using the “Minimum size” setting.
In iWork applications for Mac OS (Pages, Numbers and Keynote), do not use the standard Mac OS “Print” → “PDF” option. Instead, go to “File” → “Export” → “PDF…” and change the “Quality” setting to “Good”. (iWork names its quality settings “Good”, “Better” and “Best”. The “Good” setting provides significant compression. The “Best” exactly reproduce your pictures in their original quality and size.)
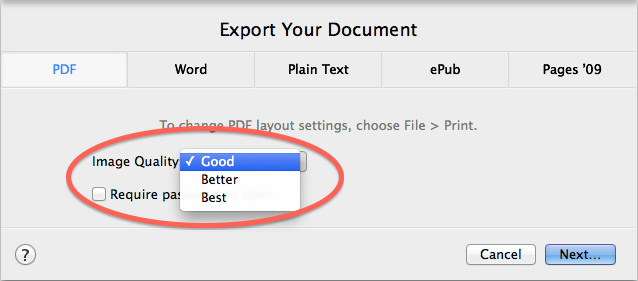
iWork Pages exporting to PDF using the “Good” quality setting.
In OpenOffice.org and LibreOffice, use the “File” → “Export as PDF…” option. If you have many photos, use “JPEG compression”; if almost every picture is a diagram, use “Lossless compression”. To further reduce the file size, reduce the “Quality” and “resolution” numbers, as always realising that this degrades the picture quality – review your compressed PDF before sending it.
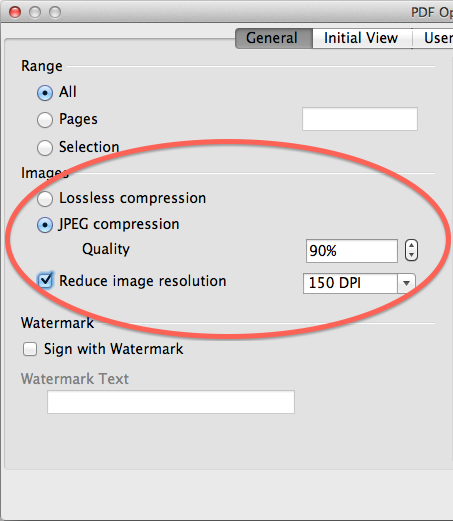
LibreOffice exporting to PDF with JPEG compression and resolution reduction.
3. Compress pictures before you export
In Microsoft Office, you can change how pictures are stored before you export them. This means that any compression will reduce the size of your Word, Excel and PowerPoint documents as well as the resulting PDFs. This is powerful, but irreversible – if you compress, save and then realise you went too far, you’ll need to track down your source pictures and add them all over again.
To do this, select any picture in your document, then find the “Picture Tools” heading on the ribbon, select “Format” under that, then “Compress Pictures”.

Finding “Compress Pictures” in the Word 2013 ribbon. This option only appears if you have a picture selected.
You then choose how much compression you want. Note that the single “Apply only to this picture” checkbox determines if you fix a single troublesome picture, or everything in the document – and the more destructive form is when this is unchecked.
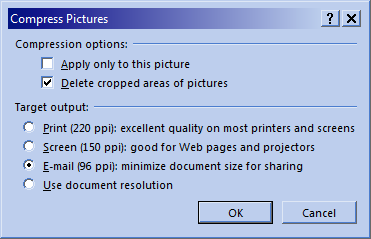
Word 2013 Compressing all pictures in a document.
LibreOffice has a similar option, but only for one picture at a time. Right-click (or control-click) on the picture, then select “Compress Graphic…”.
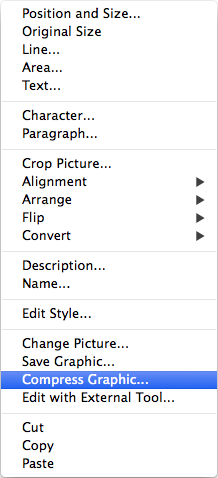
The LibreOffice image popup menu is quite long. “Compress Graphic…” is near the bottom.
You are then offered the chance to change both quality and resolution settings for the individual image. This can be confusing, but LibreOffice does helpfully add a “Calculate” button. Click on it to see what effect your settings are having.

All the best dialog boxes have a setting for Lanczos Interpolation in them.
4. Compress pictures before you add them to the document
If your application and operating system don’t seem to offer any choices for PDF compression, there is still one possibility. Find the picture files you’re using, compress them individually, then replace each picture in your document with its compressed counterpart.
This should be viewed as a last resort; it takes more time, risks inconsistency, and you have to keep track of multiple copies of every picture that goes into your document.
It isn’t even guaranteed to work; while your PDF file size will usually be comparable to the sum of its inputs (as noted above), particularly wasteful PDF exporters may not make proper use of this.
Anyway, if you do this, you need to:
- Open a graphics editor. If you don’t have one to hand, use Paint (Windows) or Preview (Mac OS).
- Open a picture.
- Scale down the picture – as far as you can without losing crucial detail.
- Save the picture with a new name or folder using JPEG compression (photos) or PNG (diagrams).
This is tedious; more sophisticated (and expensive) editors may apply this sequence of commands to an entire folder of pictures; the Mac OS Automator can too.
How do I know if it worked?
To see if you’re really making the file smaller, you’ll need to view its properties in Explorer (Windows) or Finder (Mac OS). Switch to the “Details” or “List” view to know the sizes.

The file sizes show that the compression settings are having a dramatic effect.
Also view the PDF and zoom into it. Can you see where pictures have blurred due to compression?
You can see this effect below, with the same iWork Pages document exported at three different zoom levels. The picture shown was originally a small thumbnail on a large page. The change in quality is easy to see from this close – but, for many uses, the difference between “Better” and “Best” will be invisible to the reader.

“Best” quality – quality limited only by zoom level.

“Better” quality – some blurring.
“Good” quality – visible decrease in resolution.
My document has no pictures, so why does it still generate huge PDFs?
While the most common cause of huge PDFs is huge pictures, there are other causes:
- Lots of text – if your original document is a novel, the sheer number of words may make it a few megabytes long. War and Peace, stored as unformatted text, is 3.1 megabytes on Project Gutenberg.
- Lots of fonts – to display properly on other computers, a PDF must contain its own fonts. These are usually only a few hundred kilobytes each, but they can add up. In particular, they add up in sheet music – most of the symbols are generated using specialised fonts, which must be embedded in your PDFs. Even a short piece may need several hundred kilobytes of fonts.
- Graphical effects – your word processor may generate shadows or reflections of text, but these may become graphics in your PDF. If in doubt, see if removing them has any effect on the PDF size.
- Other media – if your tools are capable of putting sound effects or movies in the PDF, these two may take up enormous amounts of space.
Conclusion
PDFs are an excellent way to share your creations. But, to share properly, you must take some control over their size and quality. Only you know if the PDF you’re generating will be e-mailed to all your friends (requiring minimum file size), or taken to a print shop on DVD and printed as an A3 poster (requiring maximum quality). If in doubt, export using different settings, compare file sizes, and look at the contents.