You can do this, but there are at least three distinct methods. Each has different compromises.
The destination: single PDF
For the purposes of this exercise, we want to finish with a single PDF document, storing the entire book. This is what you want almost all the time, including:
- Printing yourself, with the printer on your desk
- Sending files to other people to download and print
- Taking to your local print shop
- Selling via print-on-demand
PDF may not not be sufficient if:
- You want to share work other people can edit – for this, provide your original notation file and also export to MusicXML
- You want to distribute your music with interactive playback or video – tools exist for this, but are too complex to discuss here
- You are working for a major publisher – in this case, they should provide specific file and formatting guidelines
So, how do we go from notation to a single PDF?
Method 1: Write one big notation file
Most notation tools can format text and graphics objects as well as notation. So, it is possible to write your entire book in your notation editor.

Method 1 illustrated: single notation file to single PDF.
Good points about one big notation file
- You only have a single source document to keep track of.
- If your music contains multiple parts for different instruments, you can format those as well.
- If the music is meant to be played in order (because it is a complete symphony, for example), you can generate a single continuous audio file.
Bad points about one big notation file
- While most notation editors can add paragraph text, they are not good at it. If your book contains block lyrics or descriptions of the pieces or composers, you may find it frustrating to format. This is especially severe if your text needs to flow across multiple pages.
- Once you have a few dozen pages, your notation file may become slow to open and display, especially on older computers.
- Depending on the editor, you may find that certain formatting is “global” and affects your entire document. Examples include margins, line break settings, staff sizes and font styles. You may change one page to make it look better, and discover that every other page has been mangled.
- Collaborating with other composers means sending them the entire document, waiting for them to send it back, and hoping that they don’t make any formatting changes that affect your existing work.
- Changing the order of the pieces can be difficult. Most editors will not respond well to cutting and pasting an entire piece to a new location. Instead, you will probably need to do this:
- Insert a blank bar at the new location.
- Create a new time signature, and possibly an anacrusis bar.
- Insert the correct number of blank bars after the new time signature.
- Create a new key signature.
- Copy the notes from the old location to the new one.
- Duplicate any other formatting, such as special bar lines, that weren’t copied.
- Delete the bars where the moved piece came from.
- Make sure that the key signature and time signature changes throughout your document remain correct.
Method 2: Write multiple notation files, export whole pages and merge them together
If your task is not suited to storing in a single notation file, you can write it in multiple files, and merge their output. A simple way to do this is to generate each piece as a PDF, then combine them together.
Once you start doing this, not every page has to be created in your notation editor. If a page only contains text, you can create that in a word processor, then combine it with the notation pages to create the complete book.
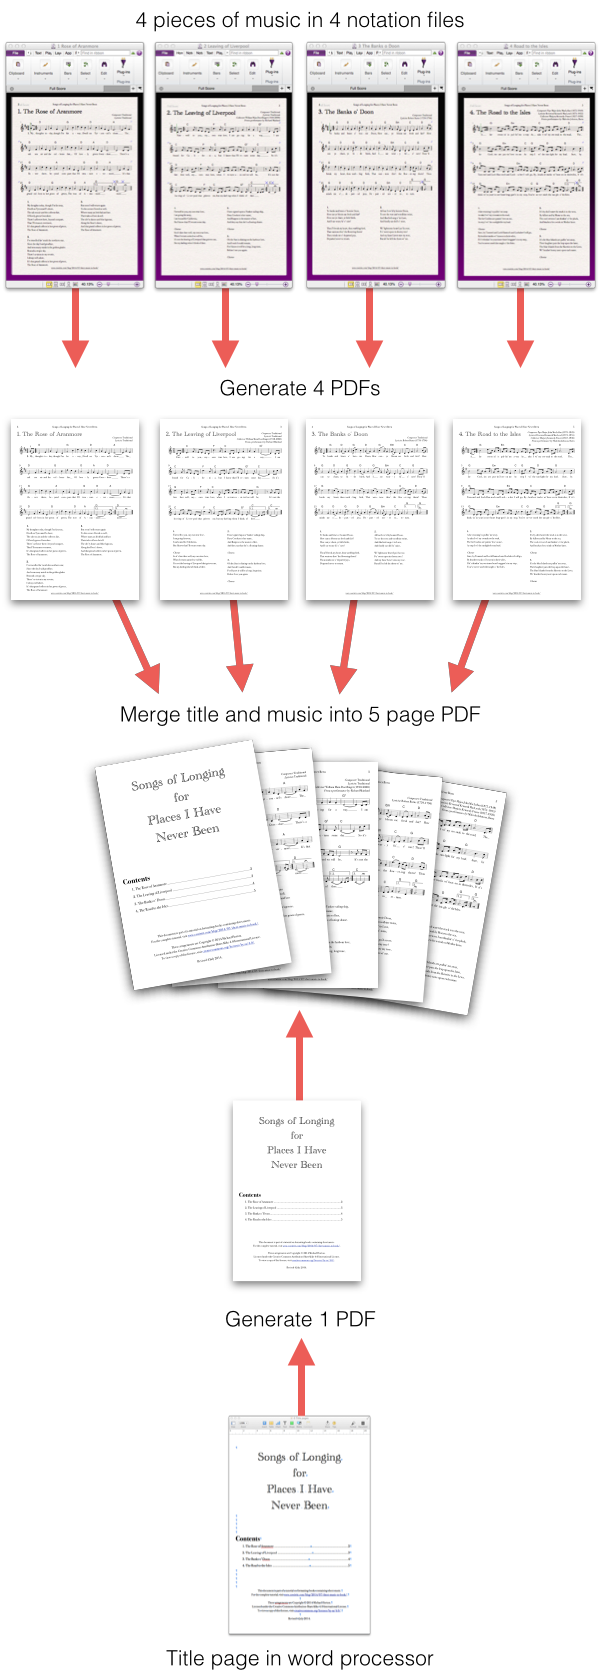
Method 2 illustrated: multiple notation files to multiple pages to single PDF.
How do I merge pages?
On Mac OS, you already have the tools for this. “Preview.app”, the application that opens by default for viewing PDFs, can also merge them.
- Open the PDF containing the first PDF in the set that you want to merge together.
- Go to the “View” menu and select “Thumbnails”.
- Open a Finder window containing the second PDF you want.
- Drag the second PDF from the Finder window to the thumbnail column on the left side of the Preview window.
- Drop the second PDF into the space between pages where you want to insert it – usually just after the last page of the existing document.
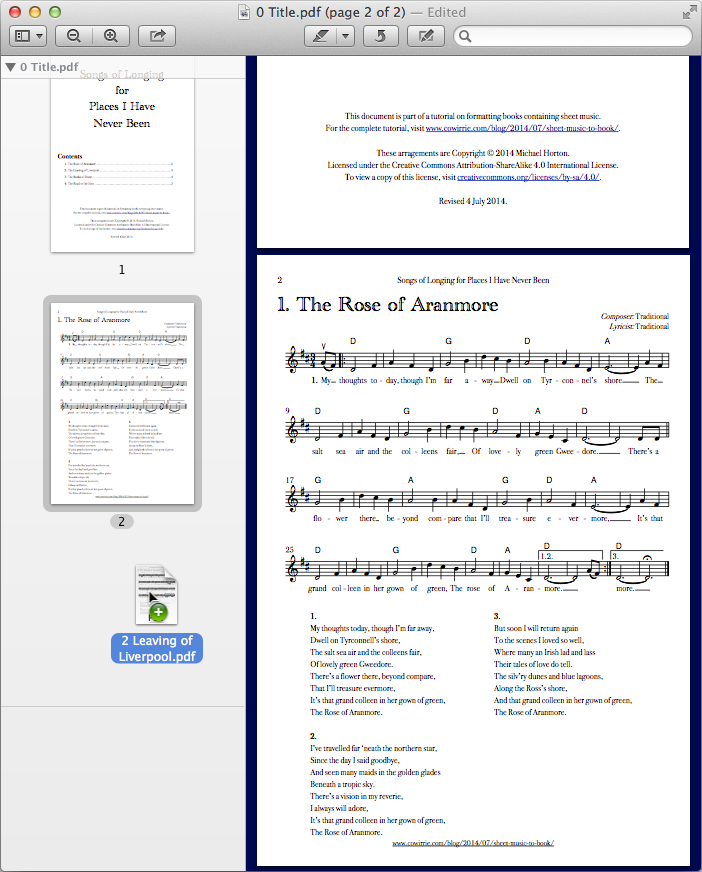
Using Mac OS Preview.app to drag one PDF into another, merging them
On Windows, you will need a tool for manipulating PDFs. You can pay for one (including the full Adobe Acrobat), or you can try one of the free tools that merge PDFs.
Good points about merging pages
- Your work is divided up into multiple files across logical boundaries. Each piece of music is one notation file, each text section is one word processor file.
- It is easy to share portions of the book for collaboration or proofreading while the book is incomplete.
- Music in the book will look exactly as it does in your notation editor.
- If your pieces require specific formatting quirks, you can apply them without affecting the rest of the book.
Bad points about merging pages
- While you can now format each piece individually, any change you want applied consistently must be made to every single notation file.
- If you have multiple parts to generate, the number of files you will create is (number of pieces × number of parts).
- If your book is long enough to need page numbers (and if it isn’t, you could probably have worked within a single notation file), maintaining page numbering becomes a nightmare…
- Some of your page numbers will be on word processor pages, and others will be on notation pages. It is up to you to make sure these have the same position (including variation on odd/even pages) and font settings in the two applications.
- Every piece will need to have its starting page number configured.
- If you have multiple parts, every part of every piece will need its starting page number configured.
- If you change one of the pieces and the change affects its page count, every piece after that one will need its starting page number changed.
- If you want a table of contents, you will need to manually type and number it.
Method 3: Write multiple notation files, export graphics and insert them into a word processor document
Having used a word processor for method 2, we might decide that it is better for all of the text, with just little rectangles of notation. We can do this if we export the music as individual image files, and insert them into a word processor document.
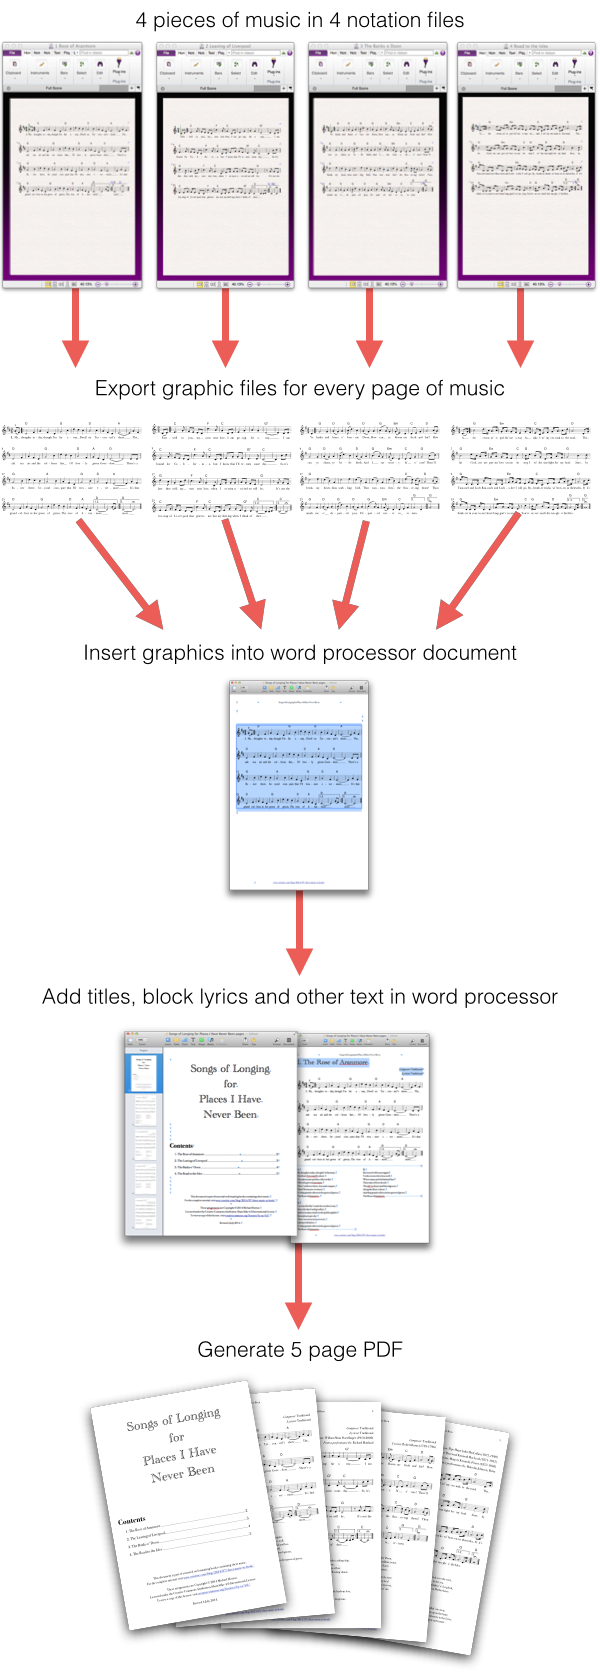
Method 3 illustrated: multiple notation files to multiple graphic files to single word processor document to single PDF.
Which graphic format?
Before using this method, please read the entirety of What are vector graphics? When should I use them? Music notation is a perfect example of an image that can and should be stored in vector format. It is full of lines and curves that require precise printing.
Most modern notation editors can export to PDF and SVG formats. Some also support EPS.
If you happen to have the iWork Pages word processor, its support for PDF as a graphics format is ideal. It responds smoothly if you move or resize the music, and it can be trusted to print sheet music exactly as it appears on the screen.
If you are using LibreOffice, use the SVG format. Older versions of some notation tools do not handle this well, so make sure you are up to date.
But, for the majority of the world using Microsoft Word, you have a problem. You can try EPS graphics, but examine the results closely.

Somewhere between Sibelius 6 exporting to EPS and Microsoft Word 2007 importing it, the highlighted note lost its quaver (eighth note) flag, creating an obviously incorrect bar of 4/4. Worse, this passed proofreading and was included in a concert programme seen by 300 people.
If you conclude that you can’t use or trust EPS, use the PNG format, at high resolutions – 600 Dots Per Inch (DPI) is good. If exporting to PNG from Sibelius, check the “Adjust size to improve staves” box. This will slightly adjust the “Dots per inch” number to make most lines the same number of pixels thick.
By default, Word will also shrink large PNG pictures, which is exactly what you want to avoid. So, go to the preferences and tell it not to do this. You can apply this to specific documents, and you can also make every new document have this property. Your files will be larger, but you will never lose detail unless you specifically tell it to.

In Microsoft Word for Windows 2013, Checking the “Do not compress images in file” box will preserve detail on pictures you add to documents from now on. You can also apply this to individual existing documents.
Which part of the music should I export as graphics?
Ideally, you just want the notation – no title, instrument name, page number or copyright notice. You will add those in the word processor if you want them.
In Finale, use the “Graphics” → “Export Selection” option. For help, see the Windows and Mac OS documentation for this feature.
In Sibelius, make sure that all unnecessary text is deleted or hidden. Most text can be selected, but to remove page numbers, you need to:
- Select a bar (usually the first bar).
- Go to the “Text” tab, find “Numbering” and select “Page Number Change”.
- Make sure the radio button “Hide page numbers” is selected.
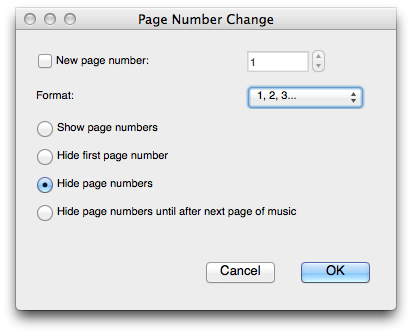
Hiding page numbers in Sibelius
Now you can go to the “File” tab and select “Export” → “Graphics”. Make sure the “Use smallest bounding box” is checked. Select your preferred format (and dots per inch, if exporting to PNG) and click on “Export”.
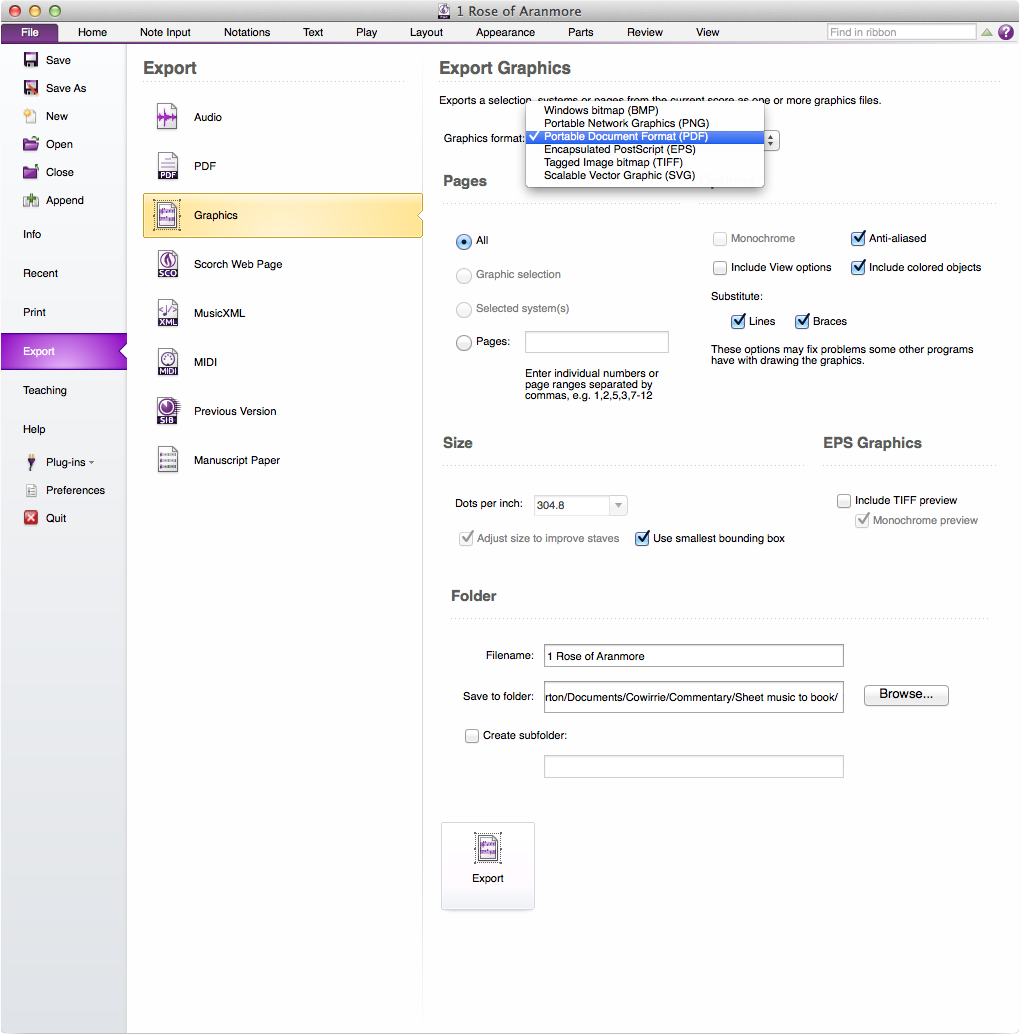
Exporting graphics from Sibelius
In MuseScore 1.3 (the current stable release), go to “File” → “Save As” and choose an appropriate format. In newer nightly builds and pre-release versions, go to “File” → “Export”. In both cases, you are not given any choices about selections or bounding boxes. Your graphic will contain the whole page.
When your graphic contains the whole page
If you had to export the page, or SVG file you exported was off-centre (a surprisingly common problem), you need to crop it. Most word processors allow you to adjust image bounds, but this is fiddly. You may be better off cropping it in an image editor. For PNG graphics, most paint tools can do this job. For PDF, EPS or SVG you need a specialist vector graphics editor. Inkscape can do this and is free.
- Open your vector graphic in Inkscape
- Go to “File” → “Document Properties…”.
- Under “Custom size” click on the disclosure arrow for “Resize page to content…”.
- Clock on “Resize page to drawing or selection”.
- Save your graphic. If it was in an inconvenient format for your word processor you can fix that here, too.
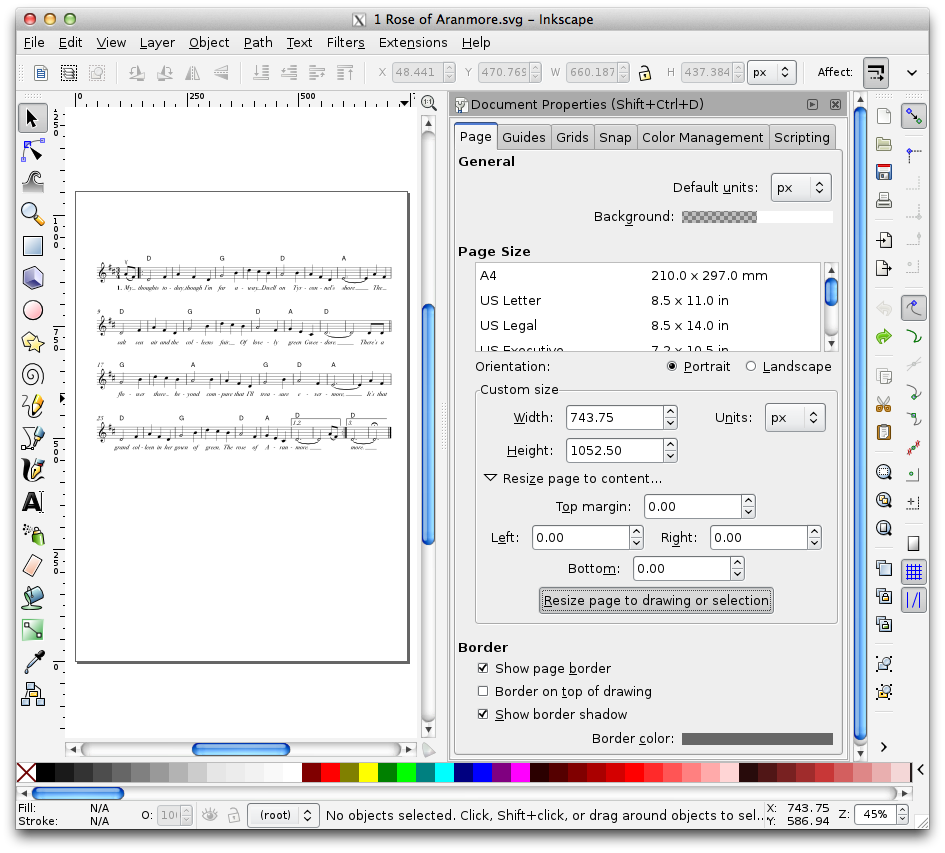
Cropping a vector graphic in Inkscape
When your music drifts around the page
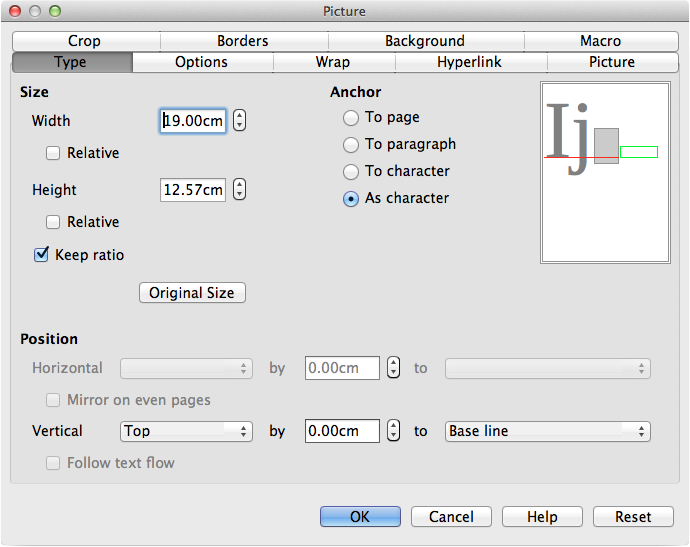
After you have inserted your music into the word processor document, it may not stay where you put it. This is usually because the word processor is using a layout system where your drawing is “anchored” to part of the text, but simply tries to appear somewhere on the page with that text. If possible, tell your music to use “Inline” placement, and format it to fill the page width. It should then move with your text.

Using iWork Pages to format an image to be inline and fill the page width
Using LibreOffice to format an image to be inline and fill the page width

Using Microsoft Word to format an image to be inline
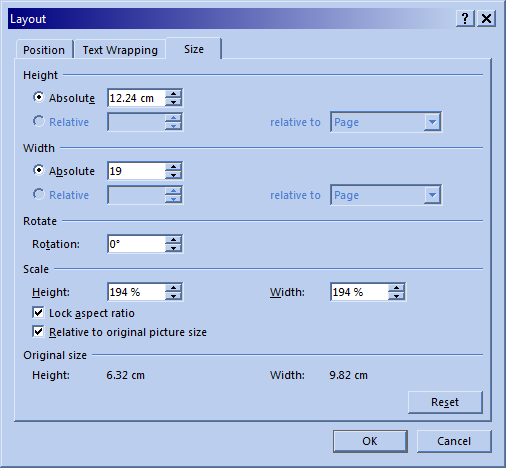
Using Microsoft Word to format an image to fill the page width
Good points about exporting graphics
- Any text that isn’t attached to individual notes (like dynamics, expressions and inline lyrics) can be formatted in the word processor. This is usually easier to write, and much easier to format consistently.
- You can also generate a table of contents from your titles, or even add footnotes, endnotes and an index.
Bad points about exporting graphics
- Every page of every part for every piece becomes a separate graphic file. For large projects, this can mean hundreds of individual files to maintain.
- If the notated pieces look similar, it is possible to mix up their ordering without realising it. Most word processors allow you to see the original filename of your graphics, so give every graphic a meaningful filename and check this if in doubt.
- If you find an error in the music – even a single note out of place – you must fix the notation, export a new graphic, then replace the graphic in your word processor.
Files
If you are curious to see what different tools created using each of these methods, download the files below.
While each output file is quite similar, the files used to get there varied widely, as can be seen in the source collection.
Example output
Method 1 – Sibelius to single PDF
Method 2 – MuseScore to merged PDF
Method 2 – Sibelius to merged PDF
Method 3 – MuseScore to SVG to LibreOffice
Method 3 – Sibelius to PDF to Pages
Method 3 – Sibelius to PNG to Word
Source files
Sheet music to book source files (10.7 MB Zip file)
File sizes
Collections of music can result in inconveniently large files, so it is worth comparing how much space these four simple pieces can occupy.
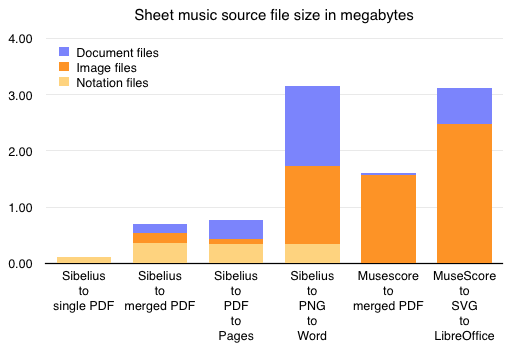
MuseScore notation files are so small that they don’t even appear on this graph, but files exported from MuseScore are large in both PDF and SVG. The high-resolution PNG files are huge, which is not surprising.
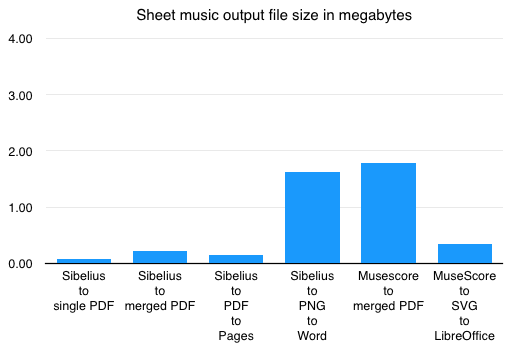
The single notation file became the most efficient PDF, at 0.07 megabytes. Meanwhile, the large PNG files became in an equally large PDF, occupying over 1.5 megabytes for just four pieces of music. While, this is not surprising, it is surprising that the MuseScore merged PDF is even larger. LibreOffice did a good job storing the large SVG images created by MuseScore into a much smaller PDF.
You should not choose an inconvenient workflow just because the files will be small. However, if you will be sharing your work by e-mail or download, you will need to plan ahead for how large your final project will be.